

How to Turn a Quilt Block into a Pillow Cover (Easy Envelope Back!)
Have an orphan quilt block you love but don’t know what to do with it? Turn it into a modern quilted pillow cover! It’s the perfect way to showcase your work—and it’s faster than finishing a full quilt. Whether you’re working with leftover blocks, testing new designs, or planning a matching set for your home, this tutorial walks you through how to transform any quilt block into a beautiful envelope-style pillow.
This is one of my favorite DIY quilted home décor projects—simple, stylish, and super satisfying!

Why You’ll Love This Easy Quilting Project:
✔ A quick finish (great for weekend sewing)
✔ A great way to test out new blocks
✔ Makes a thoughtful handmade gift
✔ Adds modern quilted charm to your space
Step 1: Decide on Your Pillow Size
Start by choosing the pillow size you want to make. If your quilt block is smaller than your chosen size, add borders to bring it up to the right dimensions.
For this project, I used a 12½” quilt block—a leftover sample from testing my Aaron’s Garden Quilt. I added a 2” border using four (4) 2½” strips to bring it up to pillow size.
Tip: Use coordinating fabric scraps to frame your block in a way that complements your palette.
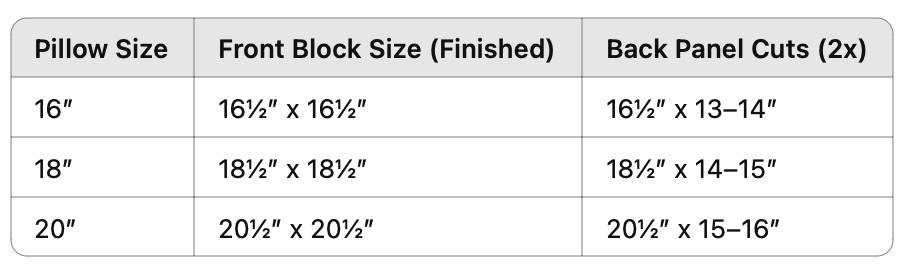
Common pillow sizes and cut sizes


Step 2: Quilt Your Block for a DIY Pillow Cover
Quilted texture gives your pillow polish and structure. Here’s how to prep your quilt sandwich:
Top: Your finished (and possibly bordered) quilt block
Middle: Batting, at least 1” larger than your block on all sides*
Bottom: Scrap or solid backing fabric, also 1” larger—this won’t show, so anything works
*Planning to quilt on a longarm (or send it to a longarmer)? You’ll need at least 4” of extra fabric on all four sides for proper loading.
Baste the layers together, then quilt as desired—by hand, walking foot, or longarm. I quilted mine with the Obi pantograph from OESD on my longarm machine.
Trim the quilted piece to match your desired pillow cover size (e.g., 16½” square for a 16” insert).


Step 3: Prep the Envelope Pillow Back
Envelope pillow backs are my favorite—no zippers, just clean lines and easy construction.
For a square pillow (e.g., 16”), cut two rectangles:
Width: Same as the pillow front (e.g., 16½”)
Height: 13”–14”, depending on how much overlap you like. I prefer 14” for a snug fit.
On each rectangle, hem one long edge:
Fold under ½”, press
Fold under another ½”, press again
Stitch along the inner fold


Step 4: Assemble Your Quilted Pillow Cover
Lay your quilted block right side up.
Place one hemmed backing panel right side down, hem toward the center, aligned with the top and sides.
Place the second panel right side down, hem toward the center, aligned with the bottom and overlapping the first.
Pin or clip around all four edges.


Sew around the entire edge with a ¼” seam allowance. Backstitch at the start and finish, and at both edges of the overlap.
Trim the corners, turn right side out, and gently push out the corners.


Step 5: Finish & Fluff
Give it a press if needed, then insert a pillow form. For a plump look, choose an insert that’s 1–2” larger than your finished cover (e.g., a 18” insert for an 16” cover).

FAQs: Quilt Block Pillow Cover Tutorial
Q: Can I use any quilt block for this project?
Yes! Any size quilt block works—you can always add borders to bring it up to size. It’s a great way to use test blocks or orphan blocks from larger projects.
Q: Is this a beginner-friendly sewing project?
Absolutely. If you’ve made a quilt block before, you can make this pillow. It’s a great weekend project for confident beginners.
Q: What’s the best pillow insert size?
Use an insert the same size or slightly larger than your pillow cover for a firm, full look. I like using a 20” insert for an 18” cover.
Q: Do I need to bind the edges?
Nope! Binding is optional. The envelope closure keeps everything clean and finished without extra steps.
Ready to Sew Your First Pillow?
Grab one of your favorite blocks and give it a second life! This is a fast, fun way to refresh your home décor or whip up a thoughtful handmade gift. If you try it, tag me on Instagram @apieceofquietquilts—I’d love to see your version!